


uSipServer
uSipServer ၏ ရွင္းလင္းခ်က္
# Overview
uSipServer is a SIP "server" on Android.
- simple to use
- works as SIP proxy and registrar
- supports only UDP-SIP
- NOT contains VOIP<=>3G/LTE call gateway function
# Quick Start Guide
Ex) use with CSipSimple as dial number "9999"
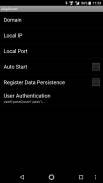
[0] configure properties below.
- Domain : SIP server domain. default value is local IP.
- Local IP : listening address to SIP message. default value is "0.0.0.0 (any)".
- Local Port : listening port to SIP message. default value is "5060".
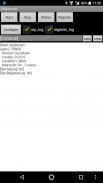
[1] Runs uSipServer, and push [start] button.
then SIP domain will be printed as below.
"sipserver started. [@xxx]" / xxx = SIP domain
[2] Runs CSipSimple.
[3] Account setting of CSipSimple.
[menu] -> [Accounts] -> [Add account]
Account name = 9999
User = 9999
Server = xxx
Password = (don't care if User Authentication = Off)
and pushes [save] button.
[4] Check registered status of a CSipSimple.
If it is registered, then you can dial.
# User authentication configuration
User Authentication config format is below;
- user delimiter is ";" (semicolon)
- user/pass delimiter is ":" (colon)
- if "User Authentication" is vacant, the authentication function is disabled
If you add 2 users "foo" and "baz", and each passwords are "bar" and "qux", set "foo:bar;baz:qux;" to "User Authentication".
# ခြုံငုံသုံးသပ်ချက်
uSipServer ကို Android ပေါ်မှာ SIP "server" လို့ဖြစ်ပါတယ်။
- ရိုးရှင်းသောသုံးစွဲဖို့
- SIP proxy နှင့်မှတ်ပုံတင်အဖြစ်အလုပ်လုပ်တယ်
- သာ UDP ကို-SIP ထောက်ခံပါသည်
- VOIP <=> 3G / LTE ကိုဖုန်းခေါ်ဆိုမှုတံခါးပေါက် function ကိုပါရှိသည်မဟုတ်ပါ
# Quick Start Guide
ထွ) ဖုန်းခေါ်ဆိုမှုအရေအတွက်က "9999" အဖြစ် CSipSimple ကိုသုံးရန်
[0] အောက်တွင်ဖော်ပြထားသောဂုဏ်သတ္တိများကို configure ။
- ဒိုမိန်း: SIP server ကိုဒိုမိန်း။ က default value ကိုဒေသခံအိုင်ပီဖြစ်ပါတယ်။
- ပြည်တွင်း IP: SIP သတင်းစကားကိုနားထောင်လိပ်စာ။ က default value ကို "0.0.0.0 (ဆို)" ဖြစ်ပါတယ်။
- ပြည်တွင်းဆိပ်ကမ်း: SIP သတင်းစကားကိုနားထောင်ဆိပ်ကမ်းကို။ က default value ကို "5060" ဖြစ်ပါတယ်။
[1] uSipServer အလုပ်လုပ်စေပြီးနှင့် [စတင်] ခလုတ်ကိုတွန်း။
ထို့နောက် SIP ဒိုမိန်းအဖြစ်အောက်တွင်ဖော်ပြထားသောပုံနှိပ်လိမ့်မည်။
"sipserver စတင်ခဲ့သည်။ [@xxx]" / xxx = SIP ဒိုမိန်း
[2] CSipSimple ကိုအလုပ်လုပ်စေပြီး။
[3] CSipSimple ကို၏အကောင့် setting ကို။
[menu က] -> [Accounts ကို] -> [အကောင့် Add]
အကောင့်အမည်ကို = 9999
အသုံးပြုသူ = 9999
ဆာဗာ = xxx
Password ကို = (အသုံးပြုသူ Authentication = ပိတ်လျှင်ဂရုမစိုက်ပါဘူး)
နှင့်ခလုတ် [မှတပါး] တွန်း။
[4] တစ်ဦး CSipSimple ကို၏မှတ်ပုံတင် status ကိုစစ်ဆေးပါ။
ဒါကြောင့်မှတ်ပုံတင်လျှင်, သင် dial နိုင်ပါတယ်။
# အသုံးပြုသူစစ်မှန်ကြောင်းအထောက်အထားပြသခြင်းအတွက် configuration
အသုံးပြုသူ Authentication config ကို format ကိုအောကျတှငျရှိ၏
- အသုံးပြုသူကိုအနားသတ်မျဉ်းဖြစ်ပါတယ် ";" (semicolon)
- အသုံးပြုသူ / သည်အနားသတ်မျဉ်း pass ":" (အူမကြီး)
- "အသုံးပြုသူ Authentication" လစ်လပ်လျှင်, အစစ်မှန်ကြောင်းအထောက်အထားပြသခြင်း function ကိုပိတ်ထားပါ
သငျသညျ 2 အသုံးပြုသူများသည် "foo" နှင့် "baz" နှင့်တစ်ဦးချင်းစီစကားဝှက်များဖြစ်ကြသည် "ဘား" နဲ့ "qux" add ဆိုလျှင်, ":; baz ဘား: foo qux;" set "User Authentication" ရန်။
uSipServer - ဗားရွင္း 1.3.1
(12-04-2020)uSipServer - APK သတင္းအခ်က္အလက္
APK ဗားရွင္း: 1.3.1package: org.joinsip.usipserveruSipServer ၏ ေနာက္ဆုံးဗားရွင္း
အျခား ဗားရွင္းမ်ား


က႑တူအက္ပ္မ်ား
 4.484.334.274.464.24
သင္ႏွစ္သက္ႏိုင္သည္မ်ားမွာ...


